User management in OneCMS is an essential part of website administration. In this tutorial, we’ll walk you through adding existing and new users to your website, highlighting the various user roles and considerations to ensure smooth website operation.
User Roles
Before diving into user creation, it’s crucial to understand the different user roles and their respective permissions:
- Administrator: Administrators have full control over the website, including posts, pages, comments, settings, user management, and more. They can perform any action on the site.
- Editor: Editors can view, edit, publish, and delete posts and pages. They can also moderate comments, manage categories, tags, links, and upload files/images.
- Author: Authors can edit, publish, and delete their own posts, along with uploading files/images.
- Contributor: Contributors can edit their posts but can’t publish them. Their posts need approval from an administrator before being published, and they cannot upload files/images.
Assign user roles carefully to maintain the security and integrity of your website.
Adding EXISTING OneCMS users to a website
If you want to grant an existing OneCMS user a specific role on your site, follow these steps:
- As an administrator, go to Users > Add New
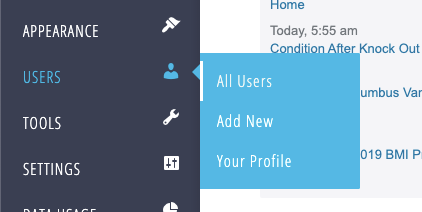
- There will be two forms on the page. You’ll use the top form Add Existing User

- Enter the username or email address associated with the existing user and select their role.
- You can choose to add the user without sending an email confirmation.
- After filling out the required fields, click the Add Existing User button.

Adding New OneCMS Users to a Website
To create a new user and specify their role, use the following steps:
- As an administrator, go to Users > Add New
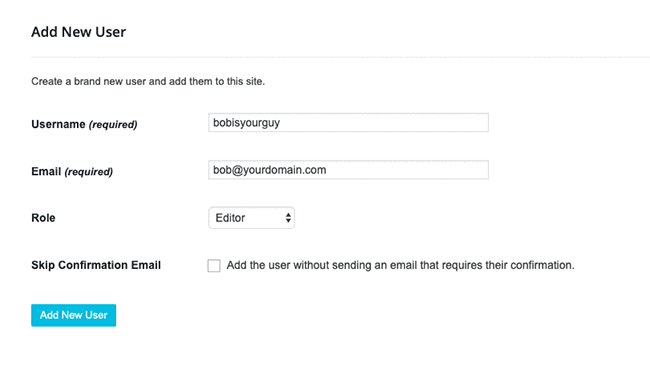
- There will be two forms on the page. You’ll use the bottom form Add New User
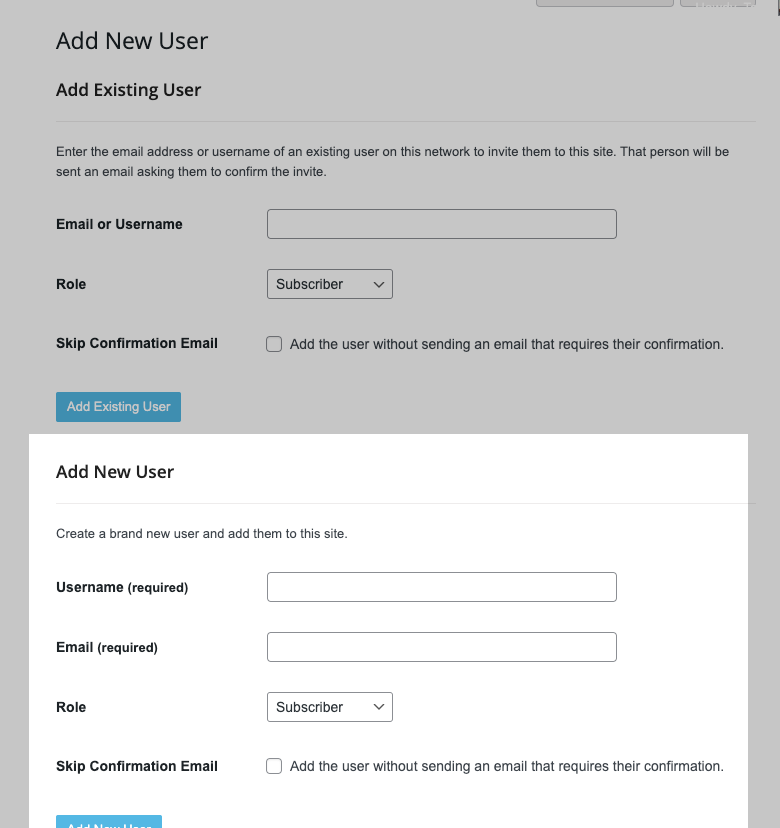
- Provide a suitable username, their email address, and select their role.
- Similar to the existing user scenario, you can choose whether to send an email confirmation.
- Once all fields are filled out, click the Add New User button.
User Creation Tips
Here are some essential tips for creating users:
- Both existing and new users receive an invitation email with a confirmation link to activate their accounts if you did not check the Add the User without sending an email that requires their confirmation checkbox. Ensure they click this link within 48 hours.
- Be aware of potential email filtering issues, particularly for institutional email addresses, which may block activation emails.
- When specifying a username, use only lowercase letters and numbers without spaces. Note that usernames cannot be changed, although the displayed name can be edited.
- Each email address can be associated with only one username due to password reset processes.
Efficient user management is crucial for a well-functioning website. By understanding user roles and following these steps, you can ensure that your site operates smoothly and securely.